
Southern Fried Chicken Recipe With Golden Crispy Skin
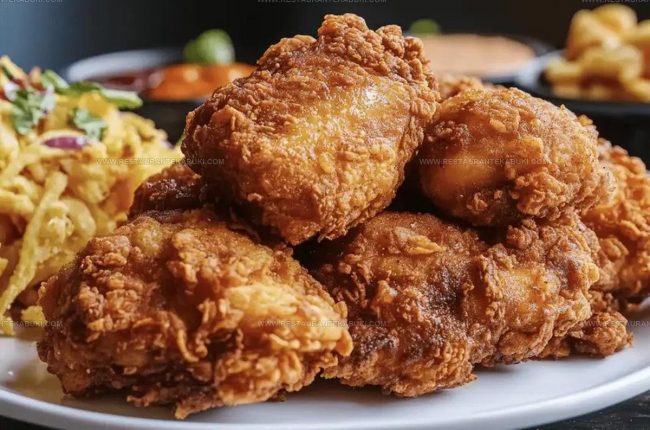
Southern fried chicken recipe is comfort food at its finest, delivering crispy, golden perfection that has satisfied appetites for generations.
There's something deeply satisfying about biting into crunchy coating that gives way to juicy, flavorful meat beneath.
Born in the American South, it has become a beloved staple at dinner tables, picnics, and gatherings across the country.
It's filling enough for hearty appetites yet universally loved by just about everyone who takes a bite.
You can serve it hot from the pan or enjoy it cold the next day, making it remarkably versatile for any occasion.
Every region has its own take, but they all share that irresistible crunch and savory goodness that keeps people coming back for more.
Prepare to make a dish that never goes out of style and always earns rave reviews.
What Makes Southern Fried Chicken So Distinct
What Ingredients Are Required to Make Southern Fried Chicken
Chicken For Frying:Marinade And Seasonings:Breading Coating:Oil For Frying:Key Equipment for Perfect Southern Fried Chicken
Preparation Process For Southern Fried Chicken
Pat The Chicken Dry
Take your 4 pounds of cut-up chicken pieces straight out of the packaging and use paper towels to pat them completely dry. Getting rid of that excess moisture on the surface is what makes the difference between soggy skin and crispy skin, so take your time with this part.
Create Your Marinade
Pour 2 cups of buttermilk into a large bowl and add 1 tablespoon of hot sauce if that’s something your taste buds enjoy. Place all your chicken pieces into this mixture, making sure each one gets fully submerged in the buttermilk.
Cover the bowl and let everything sit in the refrigerator for at least 8 hours or overnight so the chicken can really soak up those flavors and become tender.
Mix Your Dry Coating
In a shallow dish, combine your dry ingredients for coating the chicken:
Stir everything together until the seasonings are evenly distributed throughout the flour mixture.
Remove Chicken From Buttermilk
Take each chicken piece out of the buttermilk one at a time and let the excess liquid drip back into the bowl. Don’t shake it off or wring it out, since a light coating of buttermilk helps the flour stick to the meat.
Coat The Chicken Pieces
Dredge each buttermilk-coated chicken piece in your flour mixture, pressing the coating gently onto the surface so it adheres well. Make sure all sides get covered, then place each coated piece on a clean plate and let them rest for about 15 minutes while your oil heats up.
Heat Your Oil
Pour enough vegetable oil into a large, heavy-bottomed skillet or Dutch oven to come about 2 inches up the sides. Set the heat to medium-high and let the oil reach 350°F, which takes about 10 to 15 minutes.
Use a cooking thermometer to check the temperature so your chicken cooks through evenly without burning on the outside.
Fry The Chicken In Batches
Carefully place chicken pieces into the hot oil, working in batches so the pan isn’t crowded.
Fry for 12 to 15 minutes total, turning the pieces over halfway through cooking so they brown on all sides. The chicken is done when the coating turns deep golden brown and the thickest pieces reach an internal temperature of 165°F.
Drain The Fried Chicken
Remove the cooked chicken pieces with tongs and place them on a wire rack set over a baking sheet or on paper towels. This allows the excess oil to drain away while the chicken stays hot without getting soggy from sitting in its own moisture.
Rest Before Serving
Let your fried chicken sit for about 5 minutes before serving so the juices settle back into the meat and the coating has time to set up. This makes eating it much more enjoyable since the meat stays moist inside while that crust stays crispy outside.
Quick Ideas To Elevate Southern Fried Chicken
Flavor Options for Southern Fried Chicken
Smart Ways to Serve Southern Fried Chicken
Handy Storage Guide for Southern Fried Chicken
FAQs
Can I skip the resting time after seasoning the chicken?
Resting for 30 minutes lets the flavors really soak into the meat, so the chicken tastes better throughout. If you’re short on time, even 15 minutes helps, but 30 is ideal.
What if I don’t have breadcrumbs?
Panko works great and gives a crunchier texture. Regular bread crumbs, crushed crackers, or even crushed cornflakes work too; just make sure they’re seasoned.
How do I know when the oil is hot enough?
A thermometer takes the guesswork out; aim for 350°F. If you don’t have one, drop a small piece of bread into the oil; it should sizzle right away and turn golden in about 60 seconds.
Why is my chicken sticking to the pan?
This usually means the oil isn’t hot enough or the coating isn’t fully set. Make sure the oil reaches 350°F before adding the chicken, and don’t move it around too much while it cooks.
Should I cover the chicken while it drains?
Covering it traps steam and makes the skin soggy, so leave it uncovered on paper towels or a wire rack to stay crispy.

Southern Fried Chicken Recipe
- Total Time: 1 hour 5 minutes
- Yield: 8 1x
Description
Southern fried chicken is the crispy, golden dish that brings everyone to the table with its perfectly seasoned crust and tender meat inside. Making it at home means you get that authentic flavor just the way you like it, with simple ingredients and straightforward steps that even beginners can master.
Ingredients
Base Ingredients:
- 4 pounds of cut-up chicken pieces (legs, thighs, breasts)
- 2 cups buttermilk
Coating and Dry Ingredients:
- 2 cups all-purpose flour
- 0.5 cup cornstarch
- 1 tablespoon lemon pepper seasoning
- 1 tablespoon paprika
- 1 teaspoon garlic powder
- 1 teaspoon onion powder
- 2 teaspoons salt
- 1 teaspoon black pepper
Cooking Fat:
- vegetable oil for frying
Instructions
- Pat your 4 pounds of chicken pieces dry with paper towels to remove surface moisture, which helps the skin get crispier during frying.
- Mix together 1 tablespoon lemon pepper seasoning, 2 teaspoons salt, 1 teaspoon black pepper, 1 tablespoon paprika, 1 teaspoon garlic powder, and 1 teaspoon onion powder in a small bowl.
- Place your chicken pieces in a large bowl and sprinkle the seasoning mixture over them, tossing until each piece is evenly coated with the spices.
- Cover the bowl and refrigerate your seasoned chicken for at least 30 minutes so the flavors soak in properly.
- Pour 2 cups of buttermilk into one shallow bowl for dunking your chicken pieces.
- Combine 2 cups all-purpose flour with 1/2 cup cornstarch in another shallow bowl, mixing thoroughly so your coating comes out even.
- Remove each chicken piece from the buttermilk and let excess drip off before rolling it in your flour mixture, pressing gently so the coating sticks well.
- Arrange your breaded chicken on a clean plate and let it sit at room temperature for 10 minutes while you heat your oil.
- Heat enough vegetable oil in a deep skillet to submerge your chicken, bringing it to 350°F over medium-high heat.
- Carefully place your coated chicken pieces into the hot oil, making sure not to crowd the pan, and fry for 5 to 7 minutes per side until the coating turns golden brown and the internal temperature reaches 165°F.
- Transfer your finished chicken to a wire rack or paper towels so excess oil drains away completely.
- Let your chicken rest for 5 minutes before serving so the juices settle throughout the meat.
Notes
- Let your chicken pieces sit in the seasoning mix for at least 30 minutes since this time allows the flavors to really penetrate the meat rather than just coating the surface.
- Pat the chicken completely dry before seasoning because any moisture on the skin prevents that crispy, golden crust from forming during frying.
- Press the breadcrumb coating gently onto each piece so it sticks properly and doesn’t fall off into the hot oil, which would burn and create mess.
- Keep the oil temperature steady at around 350°F and avoid crowding the pan, as adding too many pieces at once drops the temperature and results in greasy rather than crispy chicken.
- Rest the fried chicken for a few minutes after cooking so the juices settle back into the meat, keeping each bite tender and moist.
- Prep Time: 45 minutes
- Cook Time: 15-20 minutes
- Category: More Fried Chicken
- Method: Frying
- Cuisine: Southern American
Nutrition
- Serving Size: 8
- Calories: 550 kcal
- Sugar: 1 g
- Sodium: 650 mg
- Fat: 35 g
- Saturated Fat: 8 g
- Unsaturated Fat: 25 g
- Trans Fat: 0 g
- Carbohydrates: 30 g
- Fiber: 2 g
- Protein: 45 g
- Cholesterol: 130 mg
Kaiden Poole
Co-Founder & Culinary Story Specialist
Expertise
Global Cuisine Inspiration, Cooking Techniques, Cross-Culture Fusion, Food Trends & Recipe Innovation, Flavor Storytelling, Food Writing, Creative Seasonal Menus
Education
- Program: Culinary Arts Certificate (Professional Cook 1 & 2)
- Focus: Fundamental kitchen techniques, food safety, menu planning, and real-world kitchen experience.
Online Gastronomy & Food Culture Courses (Various Platforms)Kaiden Poole brings global influence and culinary storytelling to the team. Based in Vancouver, BC, he earned his Culinary Arts Certificate from Vancouver Island University and expanded his knowledge through studies in gastronomy, nutrition, and sustainability. He focuses on cross-cultural flavors and creative fusion, crafting recipes that make international cuisine accessible to home cooks. For Kaiden, food is about curiosity, creativity, and connection around the table.