
Chinese Honey Garlic Chicken Recipe With Crispy Coating
Crispy Chinese honey garlic chicken recipe brings takeout-style satisfaction right into your home kitchen.
This dish combines sweet and savory flavors in a way that makes weeknight dinners feel special without requiring fancy techniques or hard-to-find items.
Golden, crunchy pieces coated in a glossy sauce create that restaurant experience families crave when ordering in.
The balance of flavors appeals to picky eaters and adventurous palates alike, making it a reliable choice for any occasion.
Preparation takes less time than waiting for delivery, and the results taste fresher and more satisfying than anything from a carryout container.
Stop scrolling through delivery apps when you can make something this good yourself in under an hour.
The Payoff of Cooking Crispy Chinese Honey Garlic Chicken
Ingredient Setup for Crispy Chinese Honey Garlic Chicken
Chicken:Honey Garlic Sauce:Garnish:Handy Kitchen Items for Crispy Chinese Honey Garlic Chicken
Complete Guide For Crispy Chinese Honey Garlic Chicken
Prepare Your Chicken Pieces
Cut your 1 1/2 pounds of boneless chicken thighs or breasts into bite-sized chunks. This size cooks evenly and makes the dish easier to eat.
Set them aside on a cutting board while you get the coating station ready.
Set Up Your Coating Station
Grab two shallow bowls.
In one bowl, combine the coating ingredients:
Pour your 2 large beaten eggs into the other bowl. Having everything prepared before you start makes the next part smooth and efficient.
Coat The Chicken Pieces
Take each piece of chicken and dredge it in the cornstarch mixture, making sure to coat all sides. Shake off any excess cornstarch that clings to the piece.
Then dip that same piece into the beaten egg, letting any drips fall back into the bowl. Place your coated pieces on a clean plate and repeat with the remaining chicken.
Heat Your Oil For Frying
Pour 1/2 cup vegetable oil into a large skillet or wok and place it over medium-high heat. Let the oil heat for about 2 minutes until it shimmers and a small piece of chicken coating sizzles immediately when it touches the surface.
This temperature ensures your chicken gets crispy, not greasy.
Fry The Chicken In Batches
Working in batches so the pieces don’t crowd the pan, carefully place your coated chicken into the hot oil.
Fry for 3 to 4 minutes on each side until the coating turns golden brown and crispy. Use a slotted spoon or tongs to flip each piece halfway through.
As each batch finishes, transfer it to a plate lined with paper towels to drain the excess oil.
Make The Sauce Base
In a separate skillet or wok over medium heat, warm 1 teaspoon sesame oil.
Add your 3 cloves minced garlic and let it cook for about 1 minute until the kitchen smells fragrant. Now stir in the sauce ingredients:
Stir everything together and let it come to a gentle simmer.
Thicken The Sauce
While the sauce simmers, mix 1 tablespoon cornstarch with 2 tablespoons water in a small cup to make a smooth slurry with no lumps. Pour this mixture slowly into your simmering sauce while stirring constantly.
Keep cooking for 1 to 2 minutes until the sauce thickens and takes on a glossy shine. This is when you know it’s ready.
Combine Chicken With Sauce
Add all your fried chicken pieces to the thickened sauce. Using a spoon or spatula, gently toss everything together until each piece is evenly coated in the honey garlic sauce.
Plate And Garnish
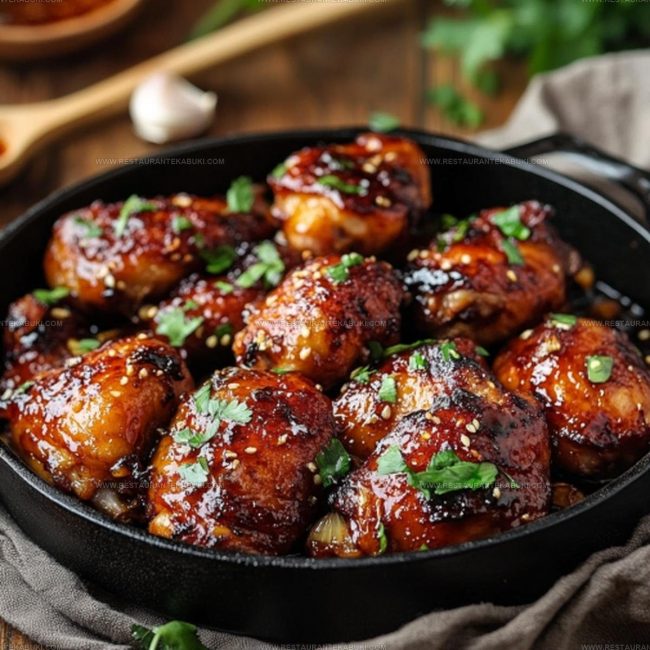
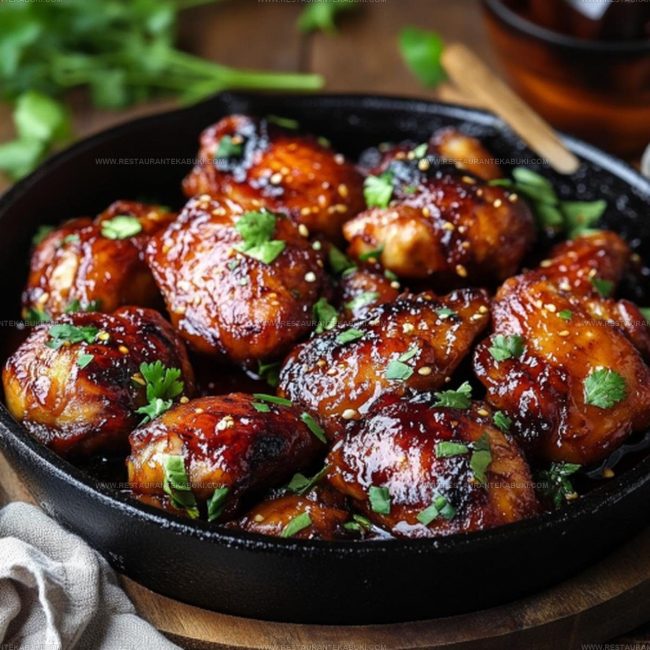
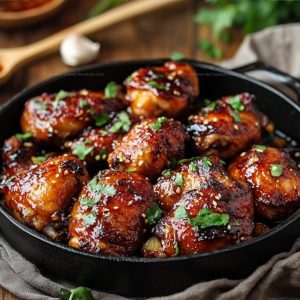
Transfer your coated chicken to a serving dish. Sprinkle sesame seeds and chopped green onions over the top.
Serve right away while the chicken is still warm, either over steamed rice or alongside fresh vegetables on the side.
Simple Ways To Refine Crispy Chinese Honey Garlic Chicken
What Creative Options Fit Honey Garlic Chicken?
Best Pairings For Honey Garlic Chicken
A Quick Guide to Storing Crispy Chinese Honey Garlic Chicken
FAQs
Why do I need to dredge the chicken in cornstarch before the egg?
The cornstarch helps the egg coating stick better to the chicken, creating a crispier outer layer when fried.
Can I skip the cornstarch slurry to thicken the sauce?
Yes, but the sauce will be thinner and runnier. The slurry gives it that glossy, clingy coating that sticks nicely to the chicken.
What if my chicken isn’t crispy after frying?
Make sure the oil is hot enough before adding the chicken. If it’s not hot enough, the coating absorbs oil instead of crisping up. Also, don’t crowd the pan; fry in batches so the chicken cooks evenly.
Can I use a different sweetener instead of honey?
Sure. Maple syrup or brown sugar work well and give similar results, though the flavor changes slightly.
How do I know when the sauce is thick enough?
It should coat the back of a spoon and drip slowly. If it looks glossy and clings to the chicken pieces, that’s the right consistency.
Should I fry the chicken right before making the sauce?
Yes. The chicken stays crispier when combined with the sauce just before serving, rather than sitting on a plate for too long.
Crispy Chinese Honey Garlic Chicken Recipe
- Total Time: 25 minutes
- Yield: 4 1x
Description
Crispy chinese honey garlic chicken brings together golden-brown chicken with a glossy, tangy-sweet sauce that clings to every bite, and it’s easier to make than you’d expect at home. Garlic and honey create that restaurant-quality flavor you keep ordering takeout for, except here you’re cooking it yourself in about thirty minutes.
Ingredients
Chicken:
- 1.5 pounds boneless skinless chicken thighs or breasts, cut into bite-sized pieces
- 0.5 cup cornstarch
- 2 large eggs, beaten
- 0.25 teaspoon salt
- 0.25 teaspoon black pepper
- 0.5 cup vegetable oil
Honey Garlic Sauce:
- 0.33 cup honey
- 2 tablespoons soy sauce
- 2 tablespoons rice vinegar
- 0.25 cup water
- 3 cloves garlic, minced
- 1 teaspoon sesame oil
- 1 tablespoon cornstarch
- 2 tablespoons water
Garnish:
- 2 tablespoons sesame seeds
- 0.25 cup chopped green onions
Instructions
- Cut 1 1/2 pounds of boneless chicken thighs or breasts into bite-sized pieces so they cook evenly throughout.
- Combine 1/4 teaspoon salt and 1/4 teaspoon black pepper with your chicken pieces and mix well.
- Place 1/2 cup cornstarch in one shallow bowl and pour 2 beaten large eggs into another bowl for your coating station.
- Dredge each chicken piece in the cornstarch, shake off any excess, then dip it into the beaten eggs until fully coated.
- Pour 1/2 cup vegetable oil into a large skillet or wok and heat it to medium-high temperature until it shimmers, about 2-3 minutes.
- Working in batches so your chicken doesn’t crowd the pan, fry the pieces for 3-4 minutes per side at medium-high heat until golden and crispy on all surfaces.
- Transfer your finished chicken to a plate lined with paper towels to drain the excess oil while you prepare the sauce.
- Add 1 teaspoon sesame oil to a separate skillet or wok and warm it over medium heat for about 1 minute.
- Stir in 3 minced garlic cloves and cook for exactly 1 minute at medium heat until the aroma becomes fragrant.
- Pour in 1/3 cup honey, 2 tablespoons low-sodium soy sauce, 2 tablespoons rice vinegar, and 1/4 cup water, then let the mixture simmer at medium heat.
- Create a slurry by mixing 1 tablespoon cornstarch with 2 tablespoons water, then stir it into your simmering sauce at medium heat for 1-2 minutes until the sauce thickens and turns glossy.
- Return all your fried chicken to the skillet with the sauce and toss everything together for 1-2 minutes at medium heat until each piece gets evenly coated.
- Transfer your chicken to a serving dish and sprinkle sesame seeds and chopped green onions over the top before serving immediately.
Notes
- Double-dredge your chicken by coating it in cornstarch first, then egg, then a second light dusting of cornstarch for extra crispiness that stays crispy even after the sauce coats it.
- Don’t skip draining the fried chicken on paper towels, as this removes excess oil so your final dish tastes light rather than greasy.
- Make your cornstarch slurry (cornstarch mixed with water) before you start the sauce so it’s ready to go when the honey mixture simmers, preventing lumps from forming.
- Toss the chicken gently in the sauce for just a minute or two rather than letting it sit, keeping the coating crispy instead of soggy; add it right before serving if your chicken sits around.
- Prep Time: 10 minutes
- Cook Time: 15 minutes
- Category: More Fried Chicken
- Method: Frying
- Cuisine: Chinese
Nutrition
- Serving Size: 4
- Calories: 475 kcal
- Sugar: 17 g
- Sodium: 520 mg
- Fat: 23 g
- Saturated Fat: 3.5 g
- Unsaturated Fat: 19 g
- Trans Fat: 0 g
- Carbohydrates: 35 g
- Fiber: 1.5 g
- Protein: 30 g
- Cholesterol: 110 mg
Kaiden Poole
Co-Founder & Culinary Story Specialist
Expertise
Global Cuisine Inspiration, Cooking Techniques, Cross-Culture Fusion, Food Trends & Recipe Innovation, Flavor Storytelling, Food Writing, Creative Seasonal Menus
Education
- Program: Culinary Arts Certificate (Professional Cook 1 & 2)
- Focus: Fundamental kitchen techniques, food safety, menu planning, and real-world kitchen experience.
Online Gastronomy & Food Culture Courses (Various Platforms)Kaiden Poole brings global influence and culinary storytelling to the team. Based in Vancouver, BC, he earned his Culinary Arts Certificate from Vancouver Island University and expanded his knowledge through studies in gastronomy, nutrition, and sustainability. He focuses on cross-cultural flavors and creative fusion, crafting recipes that make international cuisine accessible to home cooks. For Kaiden, food is about curiosity, creativity, and connection around the table.