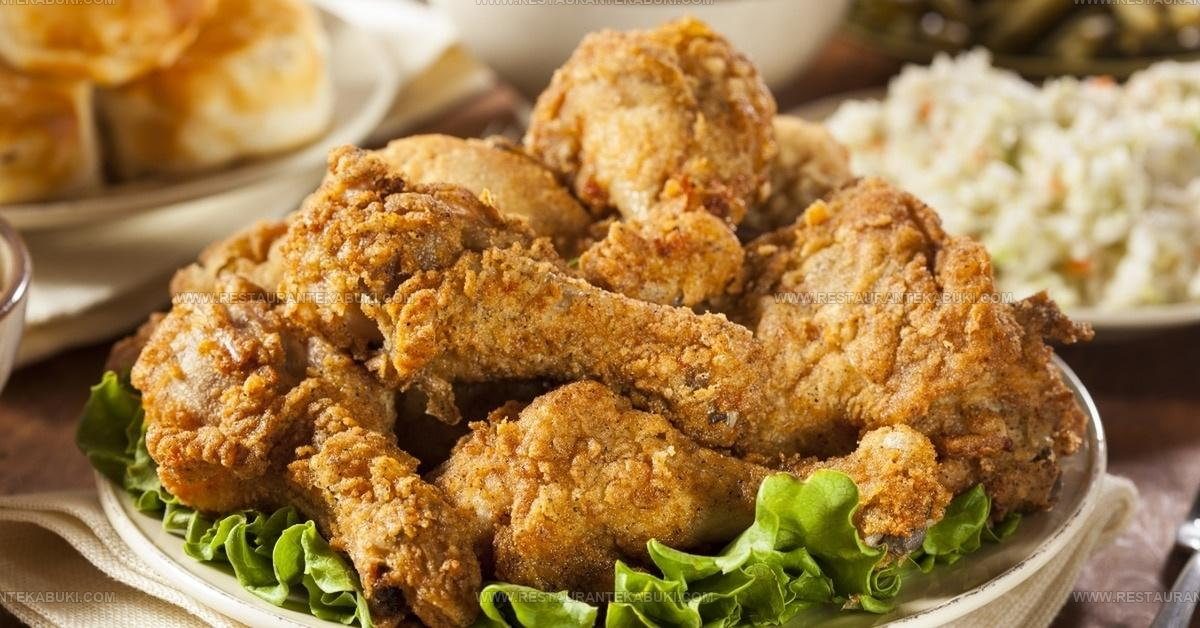
Crispy Crisco Fried Chicken Recipe That Pops With Flavor
Crisco fried chicken recipe is a classic that holds a special place in home kitchens across the country.
It has been a beloved staple for generations, trusted by home cooks who know that simplicity often produces the most satisfying results.
Rich in tradition and easy to love, it fits perfectly at casual weeknight dinners and relaxed weekend gatherings alike.
Something about the deep, satisfying crunch paired with tender, juicy meat inside makes it a dish you keep coming back to time and again.
No matter where you are in your cooking journey, this recipe feels approachable and rewarding without any fuss.
Roll up your sleeves and head to the kitchen – a truly satisfying meal is well within reach.
Why You’ll Love Serving Crisco Fried Chicken
Which Ingredients Should Come First for Crisco Fried Chicken
For The Coating:For The Wet Mixture:For Frying:Tools to Have on Hand for Crisco Fried Chicken
Full Process For Crisco Fried Chicken
Prepare The Wet Mixture
Pour 1/2 cup of milk into a medium bowl and crack 1 egg into it. Beat the egg gently with a fork until it blends into the milk.
Set this bowl to the side while you get the next part ready.
Mix The Dry Coating
Take a large Ziploc bag and add your dry ingredients for coating:
Seal the bag closed and shake it for about 30 seconds until everything blends together evenly.
Coat The Chicken In Flour
Open your bag and place 3 to 4 pieces of your 2 1/2 to 3 pounds of chicken pieces inside. Seal it back up and shake vigorously for about 15 seconds so the flour mixture clings to each piece.
Remove the floured pieces and set them on a plate. Repeat this process with the remaining chicken.
Dip In The Milk Mixture
Take each flour-coated chicken piece and dip it into the milk and egg mixture, coating both sides thoroughly. Your hands work best here.
Drop the piece back into the flour bag and shake it again for a few seconds to add another layer of coating.
Heat The Shortening For Skillet Frying
Pour 1 1/2 to 2 cups of Crisco shortening into a large skillet.
Turn the heat to medium-high and let it melt completely. The melted shortening should reach between 1/2 to 2 inches deep in your pan.
Check with a thermometer that the temperature reaches 365 degrees Fahrenheit before adding any chicken.
Brown The Chicken
Carefully place your coated chicken pieces into the hot shortening.
Let each piece cook undisturbed for about 3 to 4 minutes until the bottom develops a golden brown crust. Then flip the pieces over and brown the other side for another 3 to 4 minutes.
Finish Cooking At Lower Heat
Once all sides are brown, reduce your heat down to medium-low and bring the temperature down to 275 degrees Fahrenheit. Continue cooking the chicken, turning the pieces every 5 to 7 minutes, until the meat inside feels tender when you pierce it with a fork.
This takes about 30 to 40 minutes total. Transfer each finished piece onto a wire rack that has parchment paper underneath to catch any drips.
Heat The Oil For Deep Frying
If using a deep-fryer instead, pour your 1 1/2 to 2 cups of Crisco into the fryer and set the temperature to 365 degrees Fahrenheit. Let it heat fully and reach that exact temperature before proceeding.
Deep Fry The Chicken
Gently lower your coated chicken pieces into the hot oil, working in batches so pieces don’t overlap. Fry each batch for about 15 to 18 minutes until the coating turns a rich golden brown color.
Remove the finished pieces with a slotted spoon or tongs and place them on a wire rack with parchment paper underneath.
Crisco Fried Chicken Cooking Insights To Follow
New Takes On Crisco Fried Chicken
Creative Pairing Tips For Crisco Fried Chicken
How To Store Crisco Fried Chicken For Later
FAQs
Can I use chicken breast instead of other cuts?
Yes, chicken breast works fine, though it cooks faster than thighs or drumsticks. Just keep an eye on it so it doesn’t dry out.
What’s the right temperature for the Crisco?
Heat it to 365 degrees Fahrenheit. If the shortening isn’t hot enough, the chicken absorbs too much oil and gets greasy instead of crispy.
Do I need to use Crisco specifically?
Crisco gives the chicken that classic crispy coating, but vegetable oil or peanut oil work as substitutes if that’s what’s in your kitchen.
Why do I dip the chicken twice in the coating?
The double dipping creates a thicker, crunchier crust. After the first flour coat, the egg mixture helps the second coat stick better and get extra crispy.
How do I know when the chicken is done cooking?
The meat should be tender when pierced with a fork, and any juices should run clear, not pink.
Can I prep the chicken ahead of time?
Coat the chicken and refrigerate it for a few hours before cooking. This actually helps the coating stick better and fries up crispier.

Crisco Fried Chicken Recipe
- Total Time: 55 minutes-1 hour 10 minutes
- Yield: 4 1x
Description
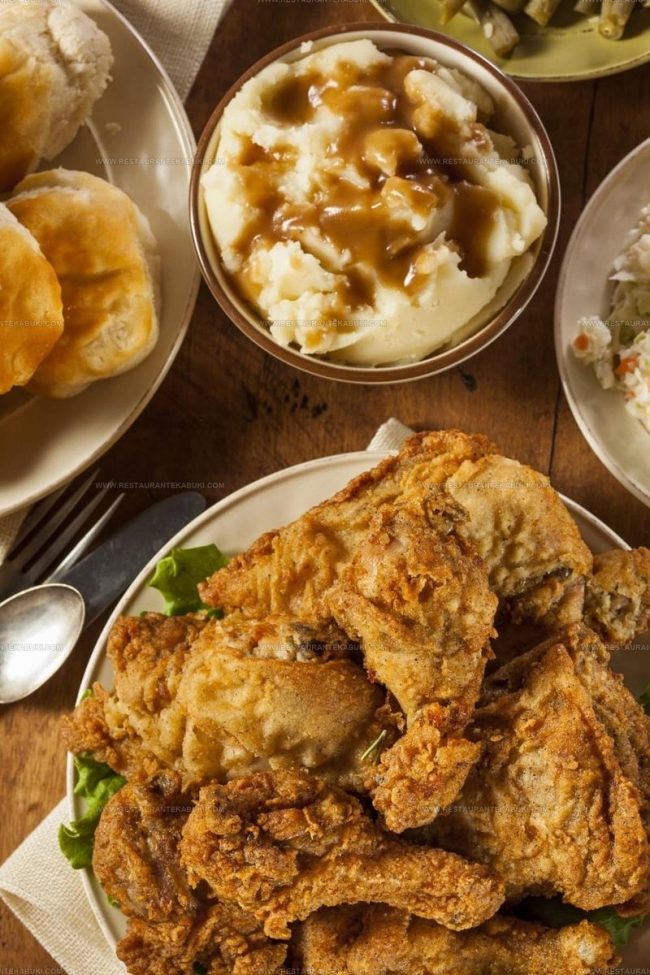
When you make crisco fried chicken, you get crispy, golden pieces that stay juicy on the inside because Crisco keeps the oil at just the right temperature. Your family will be passing plates around the table before you even set down the platter, so you better fry up a big batch.
Ingredients
Base ingredients:
- 2.5 pounds chicken pieces
Wet mixture:
- 0.5 cup milk
- 1 egg, slightly beaten
Coating and seasonings:
- 1 cup all-purpose flour
- 2 teaspoons garlic salt
- 1 teaspoon paprika
- 1 teaspoon ground black pepper
- 0.25 teaspoon poultry seasoning
Cooking fat:
- 1.5 cups Crisco shortening
Instructions
- Whisk together 1/2 cup milk and 1 egg in a medium bowl, then set it aside for coating.
- Combine 1 cup all-purpose flour, 2 teaspoons garlic salt, 1 teaspoon paprika, 1 teaspoon ground black pepper, and 1/4 teaspoon poultry seasoning in a large Ziploc bag and shake until everything is evenly mixed.
- Add your 2 1/2 to 3 pounds of chicken pieces to the bag a few at a time and shake thoroughly so each piece gets fully coated in the flour mixture.
- Take each flour-coated chicken piece and dip it into your milk-egg mixture, then return it to the flour bag for a second coating and shake again.
- Heat 1 1/2 to 2 cups of Crisco shortening in your large skillet to 365 degrees Fahrenheit on medium-high heat, making sure the melted shortening reaches 1/2 to 2 inches up the sides of the pan.
- Place your chicken pieces into the hot shortening and cook them on all sides until the exterior turns golden brown, which takes roughly 8 to 10 minutes total.
- Reduce your heat to 275 degrees Fahrenheit on medium-low and continue cooking your chicken, turning the pieces over several times, until the meat becomes tender inside, approximately 30 to 40 minutes.
- Transfer your finished chicken onto a wire rack lined with parchment paper so any excess shortening can drip away as it cools.
- If your prefer deep-frying instead, heat 1 1/2 to 2 cups of Crisco in your deep-fryer to 365 degrees Fahrenheit and fry your chicken pieces until they turn golden brown, about 15 to 18 minutes total.
- Transfer your deep-fried chicken onto a wire rack lined with parchment paper to drain and cool.
Notes
- The double-coating method; dipping chicken in the egg mixture between flour coatings; creates that extra-crispy exterior that makes fried chicken so satisfying to bite into.
- Getting your Crisco to exactly 365 degrees before adding chicken makes a real difference; if it’s too cool, your coating absorbs oil and becomes greasy instead of crispy.
- Letting coated chicken rest in the flour mixture for a few minutes before the egg dip helps the second coat stick better and fry up crunchier.
- Transferring finished chicken to a wire rack instead of a plate lets air circulate underneath, keeping the bottom from getting soggy as it cools.
- Prep Time: 15-20 minutes
- Cook Time: 40-50 minutes
- Category: More Fried Chicken
- Method: Frying
- Cuisine: American
Nutrition
- Serving Size: 4
- Calories: 850 kcal
- Sugar: 1 g
- Sodium: 1200 mg
- Fat: 70 g
- Saturated Fat: 20 g
- Unsaturated Fat: 45 g
- Trans Fat: 2 g
- Carbohydrates: 30 g
- Fiber: 1 g
- Protein: 50 g
- Cholesterol: 150 mg
Kaiden Poole
Co-Founder & Culinary Story Specialist
Expertise
Global Cuisine Inspiration, Cooking Techniques, Cross-Culture Fusion, Food Trends & Recipe Innovation, Flavor Storytelling, Food Writing, Creative Seasonal Menus
Education
- Program: Culinary Arts Certificate (Professional Cook 1 & 2)
- Focus: Fundamental kitchen techniques, food safety, menu planning, and real-world kitchen experience.
Online Gastronomy & Food Culture Courses (Various Platforms)Kaiden Poole brings global influence and culinary storytelling to the team. Based in Vancouver, BC, he earned his Culinary Arts Certificate from Vancouver Island University and expanded his knowledge through studies in gastronomy, nutrition, and sustainability. He focuses on cross-cultural flavors and creative fusion, crafting recipes that make international cuisine accessible to home cooks. For Kaiden, food is about curiosity, creativity, and connection around the table.