
Smoky Cowboy Butter Chicken Thighs Recipe Done Right
Cowboy butter chicken thighs bring bold, rustic flavor to any dinner table with a richness that feels both hearty and satisfying.
Few dishes manage to feel this indulgent while still being approachable enough for a regular weeknight.
Rooted in the spirit of wide-open cooking, this recipe carries a confident, no-fuss attitude that makes it genuinely exciting.
The result is a deeply savory dish with a golden, buttery finish that speaks for itself.
It suits casual backyard dinners just as well as cozy indoor meals, giving it a wonderfully versatile place in any cook's rotation.
When you sit down to something this good, the experience feels like a well-earned reward.
Go ahead and check out the full recipe – you won't regret it.
Why Cowboy Butter Chicken Thighs Belong on Your Table
Cowboy Butter Chicken Thighs Ingredient Overview
Main Ingredients:Supporting Ingredients:Cowboy Butter Chicken Thighs Cooking Tools
Step By Step Instructions For Cowboy Butter Chicken Thighs
Heat Your Oven
Get your oven going at 375°F and grab a 9 by 13-inch baking dish to have ready for your chicken.
Dry The Chicken Thighs
Pat your 4 pounds of bone-in, skin-on chicken thighs completely dry with paper towels.
This step matters because moisture on the skin keeps it from crisping up nicely, so take your time getting the skin as dry as possible.
Arrange Chicken In The Dish
Place the chicken thighs in your baking dish in a single layer with the skin facing up.
Space them out so they aren’t crowded against each other.
Season The Chicken
Sprinkle 1/2 teaspoon of kosher salt lightly across all your chicken thighs, covering them evenly.
Add The Cowboy Butter
Spread 1/2 cup of softened cowboy butter across each thigh, making sure the butter gets distributed over the surface. This butter is going to keep everything moist while it cooks.
First Bake
Put the dish into your 375°F oven and let it cook for 40 minutes without disturbing it.
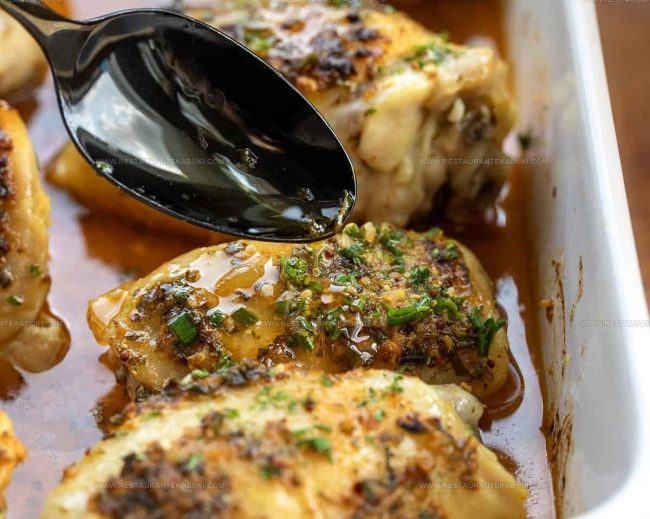
Baste The Chicken
Take the chicken out of the oven and spoon the pan juices and melted butter that have collected at the bottom up and over each thigh.
This keeps your chicken tender and flavorful.
Finish Cooking At Higher Heat
Increase your oven temperature to 425°F and return the chicken to the oven for another 5 to 10 minutes.
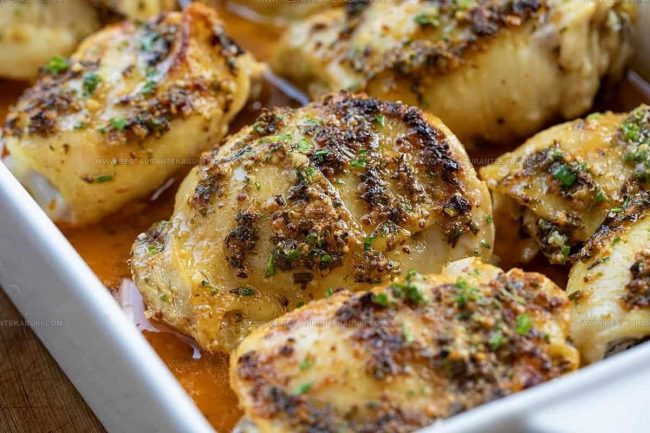
Your chicken is done when the skin turns golden and crispy and a meat thermometer inserted into the thickest part reads 165°F.
Rest And Serve
Let your chicken rest for 5 to 10 minutes on the counter before serving.
This resting period keeps the juices inside the meat. Spoon that buttery pan liquid over the top of each piece when it reaches your plate.
Cowboy Butter Chicken Thighs Cooking Insights To Follow

How Can Ingredients Be Swapped in Cowboy Butter Chicken?
How Can Cowboy Butter Chicken Thighs Be Plated
Everyday Storage Tips For Cowboy Butter Chicken Thighs
FAQs
Why do you dry the chicken skin before cooking?
Drying the skin helps it get crispy and golden instead of staying wet and soggy. The moisture prevents the skin from browning properly, so patting it dry makes a real difference in your final result.
Can you make the cowboy butter ahead of time?
Yes, you can prepare the butter days in advance and keep it in your fridge. Just take it out and let it soften before spreading it on the chicken thighs.
What’s the cowboy butter made of?
The cowboy butter typically includes softened butter mixed with seasonings like garlic, herbs, and spices that give the chicken its signature flavor. Check your cowboy butter recipe for the exact ingredients.
Do you need to flip the chicken while it bakes?
No flipping needed. Keeping the skin side up the whole time lets the heat circulate around the thighs and crisp up that skin.
How do you know when the chicken is fully cooked?
Use a meat thermometer and check that the thickest part of the thigh reaches 165°F. This ensures your chicken is safe to eat and perfectly cooked throughout.

Cowboy Butter Chicken Thighs Recipe
- Total Time: 55 minutes-1 hour
- Yield: 8 1x
Description
Cowboy butter chicken thighs brings juicy, tender chicken together with a rich, savory butter sauce loaded with garlic, herbs, and a touch of heat that makes your dinner table feel like a celebration. Brown the thighs until golden, then simmer them in that incredible butter sauce until everything melds into pure comfort on your plate.
Ingredients
Protein:
- 4 pounds bone-in, skin-on chicken thighs
Seasonings:
- 0.5 teaspoon kosher salt
Fats and Flavoring:
- 0.5 cup prepared cowboy butter, softened
Instructions
- Get your oven heating to 375°F and grab a 9×13-inch baking dish for your chicken.
- Pat your 4 pounds of bone-in, skin-on chicken thighs completely dry with paper towels so the skin gets crispy.
- Lay the thighs skin side up in your baking dish in a single layer.
- Sprinkle ½ teaspoon of kosher salt evenly across all your chicken pieces.
- Take your ½ cup of softened cowboy butter and spread it generously over each thigh.
- Slide the dish into your 375°F oven and bake for 40 minutes.
- Pull the chicken out and spoon all those pan juices and melted butter back over the thighs.
- Crank your oven up to 425°F and return the dish for 5 to 10 minutes until the skin turns golden and crispy and the thickest part of the thigh hits 165°F on your thermometer.
- Let your chicken rest for 5 to 10 minutes on the counter before plating, then pour every last drop of that buttery pan sauce over the top.
Notes
- Pat your chicken thighs completely dry before cooking, since moisture prevents the skin from crisping up properly.
- Make sure your cowboy butter is soft enough to spread easily, or it will tear the delicate chicken skin when applied.
- Basting the chicken halfway through cooking keeps the meat juicy while the skin browns, so don’t skip this step.
- Let the chicken rest after cooking so the juices redistribute throughout the meat, making each bite more tender and flavorful.
- Prep Time: 10 minutes
- Cook Time: 45-50 minutes
- Category: Baked Chicken
- Method: Baking
- Cuisine: American
Nutrition
- Serving Size: 8
- Calories: 573 kcal
- Sugar: 0 g
- Sodium: 290 mg
- Fat: 45 g
- Saturated Fat: 15 g
- Unsaturated Fat: 25 g
- Trans Fat: 0 g
- Carbohydrates: 1 g
- Fiber: 0 g
- Protein: 38 g
- Cholesterol: 140 mg
Kaiden Poole
Co-Founder & Culinary Story Specialist
Expertise
Global Cuisine Inspiration, Cooking Techniques, Cross-Culture Fusion, Food Trends & Recipe Innovation, Flavor Storytelling, Food Writing, Creative Seasonal Menus
Education
- Program: Culinary Arts Certificate (Professional Cook 1 & 2)
- Focus: Fundamental kitchen techniques, food safety, menu planning, and real-world kitchen experience.
Online Gastronomy & Food Culture Courses (Various Platforms)Kaiden Poole brings global influence and culinary storytelling to the team. Based in Vancouver, BC, he earned his Culinary Arts Certificate from Vancouver Island University and expanded his knowledge through studies in gastronomy, nutrition, and sustainability. He focuses on cross-cultural flavors and creative fusion, crafting recipes that make international cuisine accessible to home cooks. For Kaiden, food is about curiosity, creativity, and connection around the table.