
Chicken Philly Sliders Recipe That Satisfies Every Time
Chicken philly sliders recipe fans know that miniature sandwiches packed with savory flavors make any gathering feel special and fun.
Sliders fit perfectly in one hand, making them ideal for casual meals where mingling matters just as much as eating.
The small size means everyone can enjoy several different foods without feeling too full, and cleanup stays simple when serving a crowd.
Comfort food takes on new life when scaled down to bite-sized portions that look adorable on any table.
Quick assembly means more time spent enjoying company rather than working in the kitchen alone.
Party planning becomes easier when the main dish requires minimal effort but still impresses every guest who takes a bite.
Perfect for game days, family gatherings, or weeknight dinners when something satisfying sounds absolutely perfect right now.
Practical Reasons to Love Chicken Philly Sliders
Easy Ingredient List for Chicken Philly Sliders
Main Protein And Vegetables:Seasonings And Oil:Cheese And Bread:Practical Tools for Making Chicken Philly Sliders
Step by Step Guide for Chicken Philly Sliders
Warm Your Pan And Vegetables
Pour 2 tablespoons of olive oil into a skillet and let it heat up over medium heat for about a minute. Once the oil is shimmering, add your sliced vegetables to the pan:
Let these cook together, stirring every so often, until they soften and turn golden at the edges.
This takes about 5 to 7 minutes. The vegetables release their natural sweetness when cooked this way, and your kitchen starts smelling pretty great.
Add The Chicken And Seasonings
Now stir in your shredded chicken along with the seasonings. Combine these together:
Mix everything so the seasonings coat the chicken and vegetables evenly.
Keep the heat at medium and let this cook for about 5 minutes, stirring occasionally so nothing sticks to the bottom of the pan.
Preheat The Oven
While your chicken mixture is cooking, get your oven ready for baking.
Set it to 350°F (175°C) and give it a few minutes to reach temperature. This timing works out nicely since your filling should be ready around the same time your oven is.
Build Your Sliders
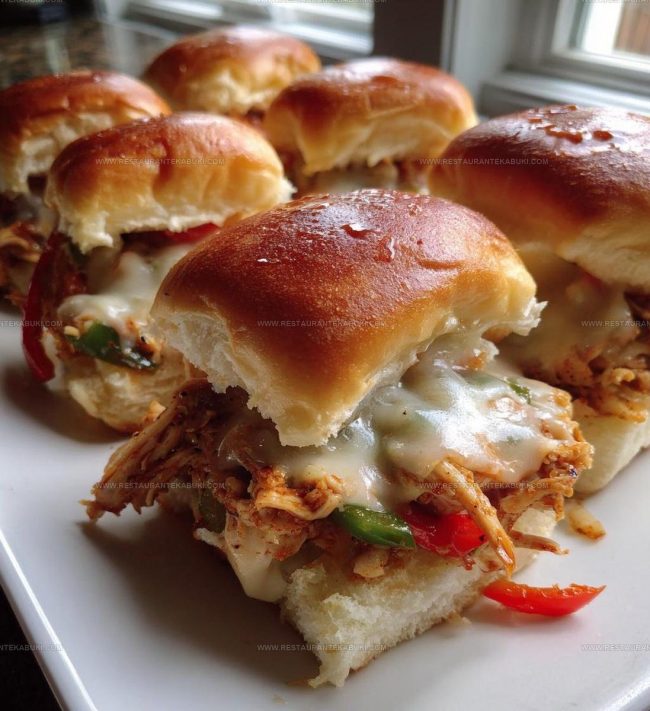
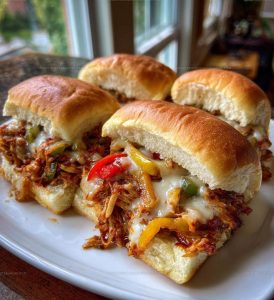
Take your 12 slider rolls and open each one. Spoon a generous portion of the chicken mixture onto the bottom half of each roll.
The filling should be warm and easy to distribute. Top each sandwich with shredded provolone cheese:
Divide this among the 12 sliders so each one gets a nice amount.
Then cap each slider with the top half of the roll.
Toast The Sliders In The Oven
Arrange all your assembled sliders on a baking sheet in a single layer.
Slide the sheet into your preheated 350°F (175°C) oven for 10 to 12 minutes. The cheese melts completely during this time, and the rolls toast up nicely.
Check around the 10-minute mark so the tops don’t brown too much.
Serve And Enjoy
Take the baking sheet out of the oven and let the sliders cool for just a minute or two.
Transfer them to a plate and serve them while they’re still warm. The cheese stays melted longer this way, and everything stays soft and easy to eat.
Simple Tips for Better Chicken Philly Sliders
Flavor Options for Chicken Philly Sliders
Practical Serving Tips for Chicken Philly Sliders
Chicken Philly Sliders Storage Method
FAQs
Can I use rotisserie chicken for this recipe?
Yes, rotisserie chicken works great and saves time. Just shred it and use the same amount the recipe calls for. The flavor is already there, so your sliders turn out delicious with less effort.
What if I don’t have provolone cheese?
You can swap it for American cheese, mozzarella, or Swiss cheese. Each one melts nicely and brings its own taste to the sliders. Pick whichever cheese sits in your fridge.
Should I cook the peppers and onions longer if they’re still firm?
Absolutely keep cooking them. Softer vegetables blend better with the chicken filling. Give them a few extra minutes if they need it-there’s no rush.
Can I prep the filling ahead of time?
The filling keeps in the fridge for up to two days in a covered container. Reheat it in a skillet before assembling and baking the sliders.
Is there a way to make these without an oven?
Assemble the sliders without cheese and pan-fry them in a skillet over medium heat for 2-3 minutes per side until the rolls turn golden. Then add cheese and cover the skillet to melt it.
Do I need to butter the slider rolls?
It helps, but it’s optional. Lightly buttering the tops gives them a nice texture when they bake. Spread a little before you add the filling and cheese.
Chicken Philly Sliders Recipe
- Total Time: 25-27 minutes
- Yield: 12 1x
Description
Chicken philly sliders bring all the flavors of the classic sandwich down to a fun, handheld size that works perfectly for parties or a casual dinner with your family. Tender shredded chicken, melted cheese, and sautéed peppers and onions stack onto soft slider buns for a satisfying bite that keeps everyone coming back for more.
Ingredients
Proteins and dairy:
- 1 pound cooked chicken, shredded
- 1 cup provolone cheese, shredded
Vegetables:
- 1 cup bell peppers, sliced
- 1 cup onions, sliced
Seasonings and bases:
- 2 tablespoons olive oil
- 1 teaspoon garlic powder
- 1 teaspoon onion powder
- Salt and pepper to taste
- 12 slider rolls
Instructions
- Pour 2 tablespoons of olive oil into your skillet and let it heat over medium heat for about 2 minutes until it shimmers.
- Add your 1 cup of sliced onions and 1 cup of sliced bell peppers to the hot oil, letting them cook for 5-7 minutes at medium heat while stirring occasionally until they soften and turn golden.
- Stir in your 1 pound of shredded cooked chicken along with 1 teaspoon of garlic powder, 1 teaspoon of onion powder, and a pinch of salt and pepper to taste.
- Keep everything moving in the pan over medium heat for about 3 minutes until the chicken warms through and the flavors blend together.
- While your filling cooks, preheat your oven to 350°F.
- Divide your chicken mixture evenly among your 12 slider rolls, placing about 2 tablespoons of filling on each one.
- Top each slider with roughly 1 tablespoon of shredded provolone cheese, distributing the 1 cup total across all the rolls.
- Arrange your loaded sliders on a baking sheet and slide them into your 350°F oven for 10-12 minutes until the cheese melts completely and the rolls turn light golden.
- Remove the baking sheet from the oven and let your sliders rest for 2 minutes before serving them warm to your table.
Notes
- Slice your peppers and onions into thin strips so they cook down evenly and distribute nicely throughout each slider.
- Cook your chicken mixture on medium heat rather than high, which helps the seasonings blend better and prevents the vegetables from browning too quickly.
- Add a thin layer of mayonnaise or a small splash of white vinegar to your chicken mixture for extra flavor that mimics the taste of traditional Philly sandwiches.
- For a dairy-free version, skip the cheese or use a melting dairy-free alternative, and the sliders will still hold together nicely with all the other ingredients binding them.
- Prep Time: 10 minutes
- Cook Time: 15-17 minutes
- Category: More Chicken Recipes
- Method: Sautéing
- Cuisine: American
Nutrition
- Serving Size: 12
- Calories: 227 kcal
- Sugar: 2 g
- Sodium: 390 mg
- Fat: 11 g
- Saturated Fat: 4 g
- Unsaturated Fat: 7 g
- Trans Fat: 0 g
- Carbohydrates: 18 g
- Fiber: 1.5 g
- Protein: 16 g
- Cholesterol: 35 mg
Kaiden Poole
Co-Founder & Culinary Story Specialist
Expertise
Global Cuisine Inspiration, Cooking Techniques, Cross-Culture Fusion, Food Trends & Recipe Innovation, Flavor Storytelling, Food Writing, Creative Seasonal Menus
Education
- Program: Culinary Arts Certificate (Professional Cook 1 & 2)
- Focus: Fundamental kitchen techniques, food safety, menu planning, and real-world kitchen experience.
Online Gastronomy & Food Culture Courses (Various Platforms)Kaiden Poole brings global influence and culinary storytelling to the team. Based in Vancouver, BC, he earned his Culinary Arts Certificate from Vancouver Island University and expanded his knowledge through studies in gastronomy, nutrition, and sustainability. He focuses on cross-cultural flavors and creative fusion, crafting recipes that make international cuisine accessible to home cooks. For Kaiden, food is about curiosity, creativity, and connection around the table.