
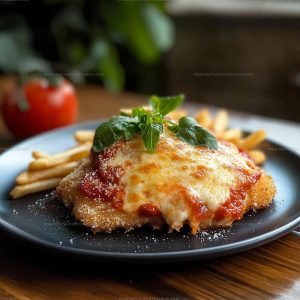
Crispy Chicken Parmigiana Recipe With Melted Cheese
Chicken Parmigiana has been winning hearts at dinner tables for generations because it combines comfort and satisfaction in one complete meal.
Italian-American cuisine gave us one of the most beloved dishes that feels special enough for company yet simple enough for any night of the week.
Golden, crispy, saucy, and cheesy — all the things that make a meal memorable come together in perfect harmony.
When you want something filling that everyone at the table will enjoy, few options compare to such a classic.
Busy weeknights and relaxed weekends both call for something dependable and delicious.
The appeal crosses all ages and preferences, making it a reliable choice when planning menus.
Here's everything you need to make it happen in your own kitchen tonight.
Why Should You Try Chicken Parmigiana
What Ingredients Should Be Arranged Before Making Chicken Parmigiana
Main Protein And Cheese:Breading Station:Sauce And Cooking:Sides:What Tools Support Chicken Parmigiana Prep
Preparation Process Steps For Chicken Parmigiana

Heat The Oven And Season The Chicken
Set your oven to 400°F and let it warm up while you work on the chicken. Take your 4 boneless, skinless chicken breasts and sprinkle salt and pepper over both sides of each one, making sure the seasoning covers the meat evenly.
Set Up Your Breading Station
Grab three shallow dishes or plates and arrange them in a line in front of you. Pour 1 cup of flour into the first dish, crack 2 eggs into the second dish and beat them together with a fork, and put 2 cups of panko breadcrumbs into the third dish.
This setup makes the breading process smooth and keeps things organized.
Bread Each Chicken Breast
Take one chicken breast and coat it in the flour, shaking off any excess.
Next, dip it into the beaten eggs, letting any extra drip off, then press it into the panko breadcrumbs until the entire surface is covered. Repeat this process with the remaining 3 chicken breasts, placing each breaded piece on a clean plate as you finish.
Fry The Chicken
Pour enough oil into a large frying pan for a shallow fry and heat it over medium heat for about 2 minutes until it shimmers. Carefully lay each breaded chicken breast into the hot oil and fry for 4 to 5 minutes on each side until the coating turns golden brown and crispy.
Assemble In The Baking Dish
Transfer the fried chicken to a baking dish, arranging the pieces so they sit in a single layer. Spoon 1 cup of Napoli sauce over each breast, spreading it to cover the top completely, then sprinkle 1 cup of shredded mozzarella cheese over the sauced chicken.
Bake Until Bubbly
Put the baking dish into your preheated 400°F oven and bake for 15 to 20 minutes until the cheese melts and bubbles at the edges.
Plate And Serve
Remove the chicken from the oven and transfer each piece to a plate.
Serve alongside thick-cut chips and a portion of mixed salad greens on the side.
Thoughtful Cooking Moves For Chicken Parmigiana
Creative Alternatives for Chicken Parmigiana
Best Pairings For Chicken Parmigiana
How To Store Leftover Chicken Parmigiana
FAQs
Can I use chicken thighs instead of breasts?
Chicken thighs work great, but they’re thicker so they need extra frying time. Add another 2-3 minutes per side to get them golden and cooked through.
What if my chicken breasts are really thick?
Pound them flat to an even thickness before breading. This helps them cook evenly and makes the coating crispy all over.
Do I need to use panko breadcrumbs?
Regular breadcrumbs work fine, but panko gives a crunchier texture that holds up better when the cheese melts on top.
How do I know when the chicken is done frying?
The coating should be golden brown on both sides. Cut into the thickest part; the meat inside should be white with no pink.
Can I skip frying and just bake the chicken?
Frying creates that crispy, golden crust that makes the dish special. Baking alone won’t give the same result.
What type of mozzarella should I use?
Use shredded mozzarella from the dairy section. Pre-shredded works perfectly and melts evenly.
Chicken Parmigiana Recipe
- Total Time: 40-45 minutes
- Yield: 4 1x
Description
Chicken parmigiana is a classic Italian dish that brings crispy, breaded chicken cutlets together with tangy tomato sauce and melty cheese for a satisfying meal. Your dinner table gets a real treat when you layer everything and let it bake until the cheese turns golden and bubbly on top.
Ingredients
Protein and Coating:
- 4 chicken breasts
- 2 cups panko breadcrumbs
- 1 cup flour
- 2 eggs
- salt and pepper to taste
Sauce and Cheese:
- 1 cup napoli sauce
- 1 cup shredded mozzarella cheese
For Serving:
- enough oil for shallow frying
- thick-cut chips
- mixed salad greens
Instructions
- Heat your oven to 400°F and season your 4 chicken breasts generously with salt and pepper on both sides.
- Set up three shallow bowls in a row: fill the first with 1 cup flour, the second with your 2 beaten eggs, and the third with 2 cups panko breadcrumbs.
- Take each chicken breast and coat it thoroughly in flour, shake off the excess, then dip it into the egg mixture until covered completely.
- Transfer your floured and egg-coated chicken directly into the panko breadcrumbs, pressing gently so the coating adheres evenly on all sides.
- Pour enough oil into a large frying pan for shallow frying and heat it over medium heat until shimmering, about 3-4 minutes.
- Carefully place your breaded chicken into the hot oil and fry for 5 minutes until the bottom develops a golden-brown crust.
- Flip each breast and fry the other side for another 4 minutes until golden throughout.
- Transfer your fried chicken to a baking dish and spoon 1 cup Napoli sauce evenly over each piece.
- Sprinkle 1 cup shredded mozzarella cheese across the top of all the chicken, covering it completely.
- Slide the baking dish into your 400°F oven and bake for 15-20 minutes until the cheese bubbles and turns light golden.
- Remove from the oven and plate your chicken alongside thick-cut chips and mixed salad greens for a complete meal.
Notes
- Don’t skip the three-dish breading station; it keeps your hands cleaner and gives each piece an even, crispy coating that stays on during frying.
- Use medium heat when frying so the breading gets golden and crunchy without burning before the chicken cooks through inside.
- Pat your chicken breasts dry before breading them, since moisture prevents the coating from sticking properly and getting that satisfying crunch.
- For a lighter version, bake the breaded chicken at 200°C for 20 minutes instead of frying, then top with sauce and cheese as usual; the result is still crispy and much less oily.
- Prep Time: 15 minutes
- Cook Time: 25-30 minutes
- Category: Baked Chicken
- Method: Frying
- Cuisine: Italian-American
Nutrition
- Serving Size: 4
- Calories: 550 kcal
- Sugar: 6 g
- Sodium: 700 mg
- Fat: 25 g
- Saturated Fat: 8 g
- Unsaturated Fat: 15 g
- Trans Fat: 0.5 g
- Carbohydrates: 40 g
- Fiber: 3 g
- Protein: 45 g
- Cholesterol: 120 mg
Kaiden Poole
Co-Founder & Culinary Story Specialist
Expertise
Global Cuisine Inspiration, Cooking Techniques, Cross-Culture Fusion, Food Trends & Recipe Innovation, Flavor Storytelling, Food Writing, Creative Seasonal Menus
Education
- Program: Culinary Arts Certificate (Professional Cook 1 & 2)
- Focus: Fundamental kitchen techniques, food safety, menu planning, and real-world kitchen experience.
Online Gastronomy & Food Culture Courses (Various Platforms)Kaiden Poole brings global influence and culinary storytelling to the team. Based in Vancouver, BC, he earned his Culinary Arts Certificate from Vancouver Island University and expanded his knowledge through studies in gastronomy, nutrition, and sustainability. He focuses on cross-cultural flavors and creative fusion, crafting recipes that make international cuisine accessible to home cooks. For Kaiden, food is about curiosity, creativity, and connection around the table.