Crispy Japanese Chicken Katsu Recipe with Panko Crust
Chicken katsu recipe brings one of Japan's most beloved comfort foods right into your home kitchen.
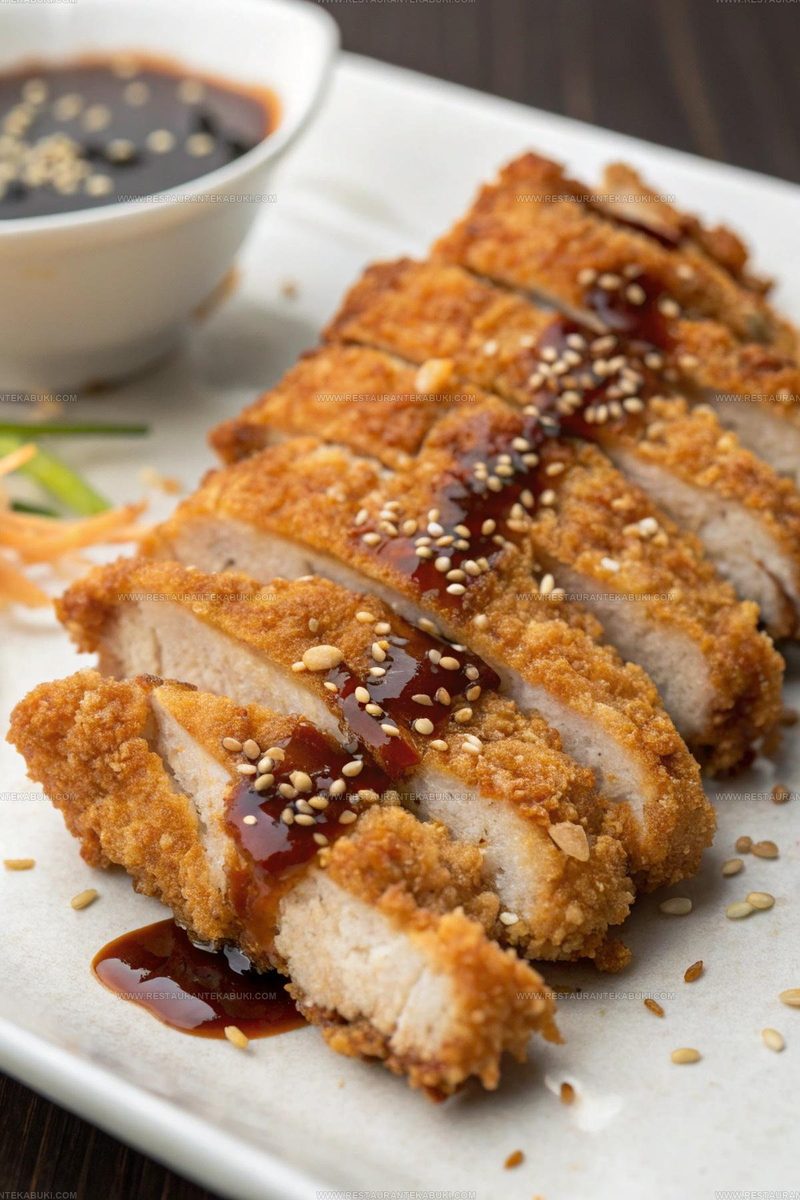
Crispy, golden-brown panko coating gives way to juicy, tender meat that satisfies every time you take a bite.
What makes it so appealing is how it balances satisfying crunch with savory flavors in a way that feels both special and approachable.
Served in homes and casual restaurants across Japan, it has earned its place as a weeknight favorite that also impresses at dinner parties.
Many home cooks love how quickly it comes together while still feeling like a treat.
Making it at home means you can enjoy that same crispy, satisfying meal any day of the week.
Inside The Appeal Of Chicken Katsu
Ingredient Collection for Chicken Katsu Japanese Chicken Cutlet
Main Protein:Coating Ingredients:Cooking and Serving:Tools That Work Best For Chicken Katsu
Clear Instructions For Chicken Katsu – Japanese Chicken Cutlet
Flatten The Chicken
Place each of your 4 boneless, skinless chicken breasts between two pieces of plastic wrap. Using a meat mallet, pound the chicken with firm, even strokes until each breast reaches about 1/2 inch thick.
This step makes the chicken cook evenly and keeps it tender.
Set Up Your Breading Station
Your breading process works best when everything is organized and ready.
Prepare three separate shallow bowls for dredging the chicken. In the first bowl, combine the dry ingredients for coating:
Mix these together with a fork or whisk.
Prepare The Egg Wash
Crack 2 large eggs into your second shallow bowl and whisk them together until the yolks and whites are fully combined. Pour 1 cup of panko breadcrumbs into your third bowl.
Coat With Flour
Take each flattened chicken breast and coat it thoroughly in the flour mixture, making sure to cover both sides. Shake off any extra flour so a light, even layer remains on the surface.
Dip In Egg
Dip the floured chicken into the egg mixture, turning it so both sides get coated. Let excess egg drip back into the bowl before moving to the next step.
Press Into Breadcrumbs
Press each piece of chicken firmly into the panko breadcrumbs, coating both sides evenly. Use gentle pressure so the breadcrumbs stick to the egg coating without falling off.
Set each breaded piece on a clean plate.
Heat The Oil
Pour 2 cups of vegetable oil into a large skillet and place it over medium-high heat.
Let the oil heat for about 5 to 7 minutes until it reaches 350°F. Use a thermometer to check the temperature accurately.
Fry The First Side
Carefully place the breaded chicken pieces into the hot oil, one or two at a time depending on your skillet size. Fry each piece for 3 to 4 minutes on the first side until the coating turns golden brown and crispy.
Fry The Second Side
Flip your chicken and fry the other side for another 3 to 4 minutes. The chicken is done when the coating is golden brown all over and the internal temperature reaches 165°F when you check it with a meat thermometer.
Drain The Oil
Transfer the cooked chicken to a plate lined with paper towels. This removes the excess oil from the surface and keeps your finished dish from being greasy.
Build Your Plate
Arrange 2 cups of cooked white rice on a serving plate or individual plates as the base for your katsu. Place the drained chicken on top of the rice.
Add Finishing Touches
Drizzle 1/2 cup of katsu sauce over the chicken and rice. Garnish your plate with 2 tablespoons of fresh parsley and place lemon wedges on the side for squeezing over everything as you eat.
What Are Useful Cooking Tips For Chicken Katsu
What Style Changes Suit Chicken Katsu?
How to Serve Chicken Katsu for a Complete Dish
Practical Storage Ideas For Chicken Katsu Japanese Chicken Cutlet
FAQs
Why do I need to pound the chicken flat?
Pounding creates an even thickness so your chicken cooks uniformly and stays tender instead of drying out in the hot oil.
Can I skip the plastic wrap when pounding?
It’s not required, but it keeps your cutting board clean and prevents raw chicken from splattering around your kitchen.
What if my panko won’t stick to the chicken?
Make sure the egg coating is wet enough and press the breadcrumbs firmly into the chicken. Dry chicken won’t hold the coating well, so pat your pieces with paper towels first.
How do I know when the oil is hot enough?
Use a thermometer to check it reaches 350°F. If you don’t have one, drop a small piece of bread in the oil; it should turn golden in about 30 seconds.
What happens if I use regular breadcrumbs instead of panko?
Regular breadcrumbs create a thinner, less crispy coating. Panko gives your katsu that satisfying crunch that makes this dish so good.
Can I cook multiple pieces at once?
Yes, but don’t crowd the pan. Leave space between each piece so they fry evenly and the oil temperature stays steady.
Chicken Katsu Recipe – Japanese Chicken Cutlet
- Total Time: 20 minutes
- Yield: 4 1x
Description
Easy chicken katsu is a Japanese crispy chicken cutlet that comes together in under 30 minutes with pantry staples you probably already have. Pound your chicken thin, coat it in breadcrumbs, and pan-fry until golden and crunchy on the outside while staying juicy inside.
Ingredients
Protein and coating:
- 4 boneless, skinless chicken breasts
- 2 large eggs
- 1 cup all-purpose flour
- 1 cup panko breadcrumbs
Seasonings:
- 1 teaspoon salt
- 1/2 teaspoon black pepper
- 1/2 teaspoon garlic powder
Cooking and serving:
- 2 cups vegetable oil
- 1/2 cup katsu sauce
- 2 cups cooked white rice
- 1 lemon, cut into wedges
- 2 tablespoons fresh parsley
Instructions
- Place each of your 4 chicken breasts between two pieces of plastic wrap and pound with a meat mallet until about 1/2 inch thick, using firm, even strokes.
- In one shallow bowl, combine 1 cup all-purpose flour with 1 teaspoon salt, 1/2 teaspoon black pepper, and 1/2 teaspoon garlic powder.
- Crack 2 large eggs into a second shallow bowl and whisk them together until fully combined.
- Pour 1 cup panko breadcrumbs into a third shallow bowl for your coating station.
- Take each chicken breast and coat it thoroughly in your flour mixture, then shake off any excess before moving to the next step.
- Dip your floured chicken into the egg mixture, making sure both sides get completely covered.
- Press each piece firmly into the panko breadcrumbs, coating both sides evenly and pressing gently so the crumbs adhere properly.
- Heat 2 cups vegetable oil in a large skillet over medium-high heat for about 5 to 7 minutes until it reaches 350°F.
- Carefully place your breaded chicken into the hot oil and fry for 3 to 4 minutes on the first side until golden brown and crispy.
- Flip your chicken and fry the other side for another 3 to 4 minutes until golden brown and the internal temperature reaches 165°F.
- Transfer your cooked katsu to a paper towel-lined plate to drain the excess oil.
- Serve each piece over a bed of 2 cups cooked white rice, drizzle with 1/2 cup katsu sauce, and garnish with 2 tablespoons fresh parsley and lemon wedges.
Notes
- Pound your chicken evenly to a consistent 1/2 inch thickness so each piece cooks at the same rate without drying out.
- Set up your breading station with flour, egg, and panko in separate bowls before you start, and press the breadcrumbs firmly onto the chicken so they stay crispy instead of falling off during frying.
- Check that your oil reaches 350°F with a thermometer before adding the chicken, since oil that’s too cool makes the coating soggy and oil that’s too hot burns the outside before the inside cooks through.
- Drain your fried katsu on paper towels right after cooking, then serve it immediately while the coating is still crunchy.
- Prep Time: 10 minutes
- Cook Time: 10 minutes
- Category: More Fried Chicken
- Method: Frying
- Cuisine: Japanese
Nutrition
- Serving Size: 4
- Calories: 590 kcal
- Sugar: 6 g
- Sodium: 850 mg
- Fat: 28 g
- Saturated Fat: 5 g
- Unsaturated Fat: 21 g
- Trans Fat: 0.2 g
- Carbohydrates: 55 g
- Fiber: 2 g
- Protein: 40 g
- Cholesterol: 160 mg
Kaiden Poole
Co-Founder & Culinary Story Specialist
Expertise
Global Cuisine Inspiration, Cooking Techniques, Cross-Culture Fusion, Food Trends & Recipe Innovation, Flavor Storytelling, Food Writing, Creative Seasonal Menus
Education
- Program: Culinary Arts Certificate (Professional Cook 1 & 2)
- Focus: Fundamental kitchen techniques, food safety, menu planning, and real-world kitchen experience.
Online Gastronomy & Food Culture Courses (Various Platforms)Kaiden Poole brings global influence and culinary storytelling to the team. Based in Vancouver, BC, he earned his Culinary Arts Certificate from Vancouver Island University and expanded his knowledge through studies in gastronomy, nutrition, and sustainability. He focuses on cross-cultural flavors and creative fusion, crafting recipes that make international cuisine accessible to home cooks. For Kaiden, food is about curiosity, creativity, and connection around the table.