Chai Coconut Chicken Strips Recipe That Brings Bold Flavor
Chai coconut chicken strips bring warmth and comfort to any meal with flavors that feel both familiar and exciting.
You can serve them as a main course for dinner or slice them into smaller portions for snacking.
The sweet and aromatic profile appeals to anyone who loves bold flavors without overwhelming heat.
Kids enjoy the crispy coating while adults appreciate the sophisticated blend of spices.
Preparation takes minimal effort, making it perfect for busy weeknights when you need something satisfying fast.
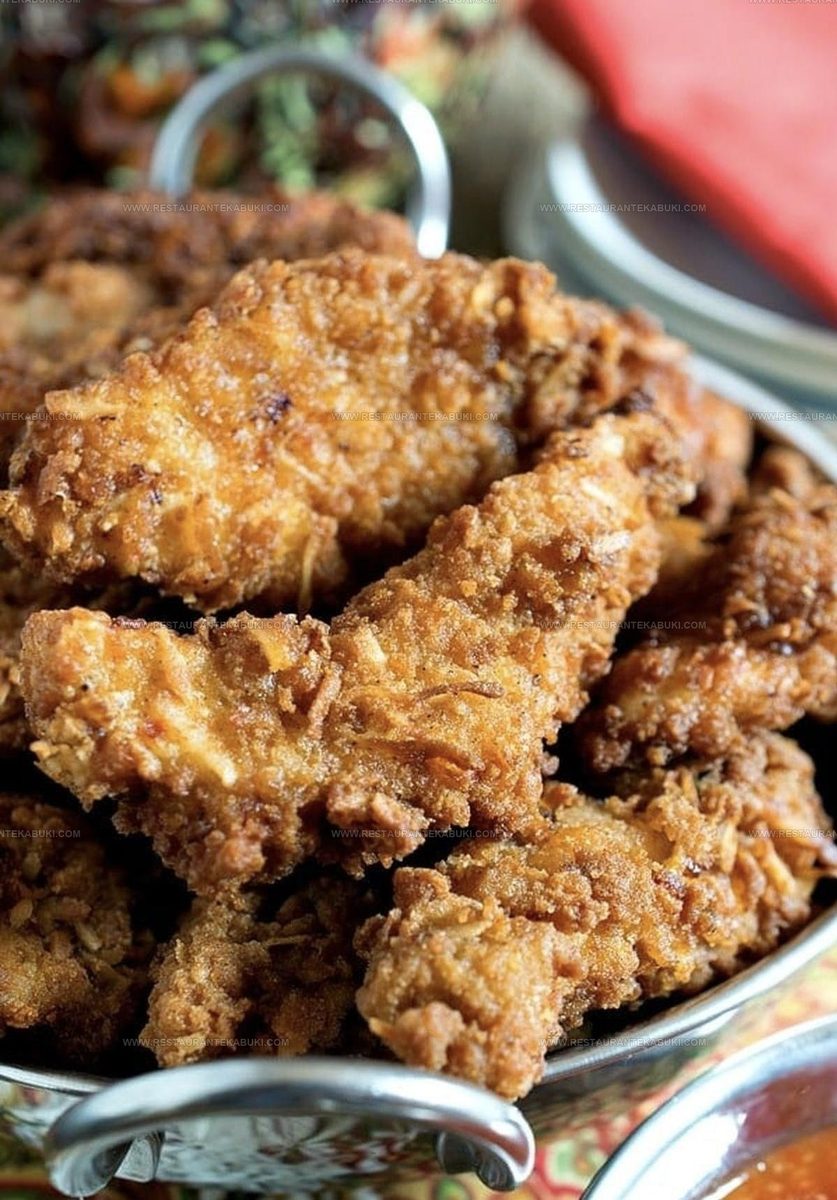
The golden exterior and tender interior create a textural contrast that keeps every bite interesting.
Follow along below for the full instructions to make them at home tonight.
Why Chai Coconut Chicken Strips Belongs on Your Table
Which Ingredients Are Used to Make Chai Coconut Chicken Strips
Main Protein:Dry Coating Mix:Wet Coating And Crispy Coating:For Frying And Serving:Must Have Tools For Chai Coconut Chicken Strips
How To Prepare Chai Coconut Chicken Strips
Prepare Your Dry Coating
Set up three separate medium bowls on your workspace. In the first bowl, combine your dry ingredients for the initial coating:
Stir these together with a fork and set this bowl aside within easy reach.
Mix Your Wet Batter
In your second medium bowl, combine the wet ingredients that will bind everything together:
Whisk these together until the mixture looks smooth and uniform, then place it next to your first bowl.
Create Your Crispy Coating Blend
Using a larger bowl, mix together all the ingredients that will give your chicken its crunchy, flavorful exterior:
Toss these together with your fingers to distribute everything evenly throughout.
Heat Your Oil
Pour enough oil into a wok or heavy-bottomed pot to reach about three inches deep. Place a candy thermometer into the oil and heat it to exactly 350 degrees F.
This takes about 10 to 15 minutes depending on how much oil and your stovetop strength.
Coat Your Chicken Strips
Take each strip of chicken and start with your first bowl, pressing it into the flour mixture so it gets fully covered.
Shake off any loose powder gently, then dip that same strip into your wet batter bowl, allowing excess to drip away. Finally, lay it in your panko and coconut mixture and press down firmly with your fingers so the coating sticks to all sides.
Fry In Batches
Place your coated strips carefully into the 350-degree F oil in small batches so the temperature stays consistent. Fry them for 6 to 8 minutes until they turn golden brown on the outside, then transfer them to a plate lined with paper towels to drain excess oil.
Repeat this process with your remaining chicken, checking your oil temperature between batches to keep it at 350 degrees F.
Serve Your Finished Dish
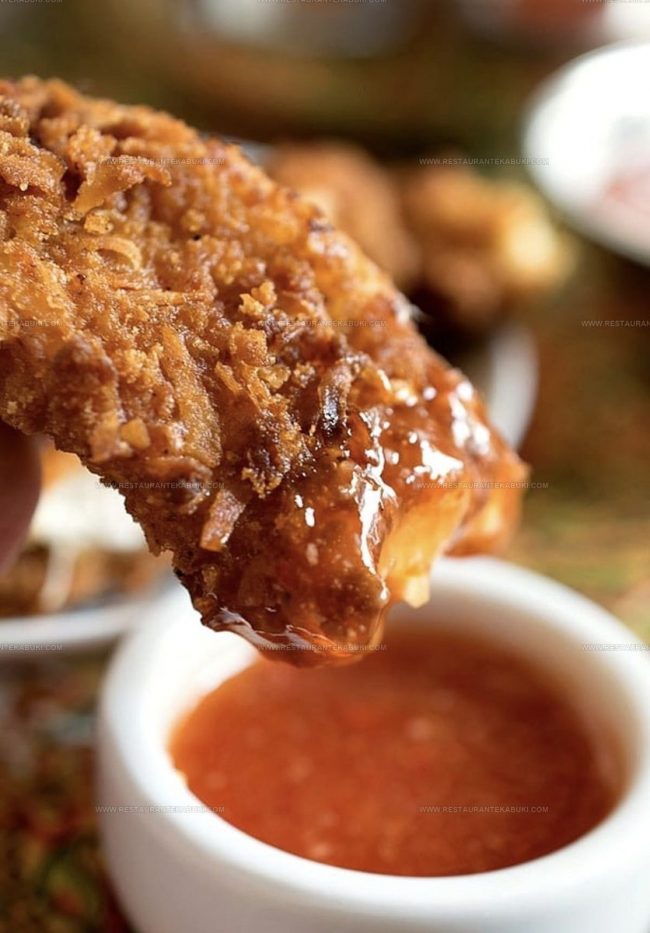
Arrange your fried chicken strips on a serving platter while they are still warm and serve alongside your Sweet Chili Dipping Sauce for dipping.
How To Improve Chai Coconut Chicken Strips
What Alternatives Can You Try for Chai Coconut Chicken Strips?
What Goes Well With Chai Coconut Chicken Strips
Smart Storage Ideas for Chai Coconut Chicken Strips
FAQs
Can I use a different type of milk instead of coconut milk?
Yes, you can swap in regular milk or even buttermilk, but coconut milk gives these strips a richer flavor that pairs really well with the chai spices.
What if I don’t have a candy thermometer?
A regular cooking thermometer works fine, or you can test the oil by dropping a small piece of bread into it – it should turn golden brown in about 60 seconds at the right temperature.
Do I have to use panko breadcrumbs?
Regular breadcrumbs work, but panko gives you that extra-crispy texture on the outside that makes these strips so good to bite into.
Can I bake these instead of frying?
You can bake them at 400 degrees F for about 15 minutes, though they won’t get quite as crispy as the fried version.
Where do I find chai spice mix?
Most grocery stores carry it in the spice aisle, but you can also blend your own with cinnamon, ginger, cardamom, and cloves.
What’s the best way to keep the oil at 350 degrees?
Fry in small batches and let the oil come back to temperature between each batch – this keeps your strips from getting greasy.

Chai Coconut Chicken Strips Recipe
- Total Time: 25 minutes
- Yield: 4 1x
Description
Chai coconut chicken strips bring warm spice and tropical flavor together in a crispy coating that you can serve with your favorite dipping sauce. This dish comes together quickly with ingredients you probably have on hand, making it perfect for weeknight dinners or when you need something satisfying to feed your family.
Ingredients
Protein Base:
- 1 pound boneless skinless chicken breasts or thighs cut into strips
- 1 egg
Dry Coating:
- 1 cup all-purpose flour divided in half
- 1 cup panko bread crumbs
- 1 cup shredded coconut
- 1/2 cup brown sugar
- 3/4 teaspoon kosher salt
- 1/4 teaspoon fresh ground black pepper
- 1 teaspoon Chai Spice Mix
Wet Coating and Cooking:
- 3/4 cup coconut milk
- 2 tablespoons garlic chili sauce
- 1/2 cup oil for frying
- Sweet Chili Dipping Sauce
Instructions
- Combine 1/2 cup flour with 3/4 teaspoon kosher salt, 1/4 teaspoon black pepper, and 1/2 teaspoon chai spice mix in a medium bowl and set it aside for your first coating station.
- Whisk together 3/4 cup coconut milk, 1 egg, and 2 tablespoons garlic chili sauce in another medium bowl to create your egg wash.
- Mix 1 cup panko bread crumbs, 1 cup shredded coconut, 1/2 cup brown sugar, 1/2 teaspoon chai spice mix, and the remaining 1/2 cup flour in a larger bowl for your final breading layer.
- Heat about 3 inches of oil to exactly 350 degrees Fahrenheit in your wok or heavy-bottomed pot using a candy thermometer to monitor the temperature.
- Working with your 1 pound of chicken strips, coat each piece in the flour mixture first, tapping away the excess before moving to the next station.
- Dip each floured strip into your egg mixture, allowing the coating to drip off slightly before transferring it to the panko mixture.
- Press each strip firmly into the panko-coconut mixture so the coating adheres completely on all sides.
- Fry your chicken strips in batches, keeping your oil temperature steady at 350 degrees Fahrenheit throughout cooking to prevent overcrowding the pot.
- Remove each batch from the oil and drain on paper towels before plating and serving alongside your sweet chili dipping sauce.
Notes
- Toast your panko and coconut mixture in a dry skillet for a few minutes before mixing it together, which adds a deeper, nuttier flavor to your coating.
- Keep your oil at exactly 350 degrees with a thermometer, since too-hot oil burns the outside before cooking the chicken through, while cooler oil makes strips greasy.
- Press the panko-coconut coating firmly onto each strip after dipping so it adheres properly and creates a crispy, golden crust instead of falling off in the oil.
- For a dairy-free version, swap coconut milk for the egg entirely by using it as your wet coating-the strips turn out just as crispy and stay tender inside.
- Prep Time: 15 minutes
- Cook Time: 10 minutes
- Category: More Fried Chicken
- Method: Frying
- Cuisine: Indian
Nutrition
- Serving Size: 4
- Calories: 420 kcal
- Sugar: 12 g
- Sodium: 480 mg
- Fat: 22 g
- Saturated Fat: 14 g
- Unsaturated Fat: 6 g
- Trans Fat: 0 g
- Carbohydrates: 28 g
- Fiber: 3 g
- Protein: 29 g
- Cholesterol: 90 mg
Kaiden Poole
Co-Founder & Culinary Story Specialist
Expertise
Global Cuisine Inspiration, Cooking Techniques, Cross-Culture Fusion, Food Trends & Recipe Innovation, Flavor Storytelling, Food Writing, Creative Seasonal Menus
Education
- Program: Culinary Arts Certificate (Professional Cook 1 & 2)
- Focus: Fundamental kitchen techniques, food safety, menu planning, and real-world kitchen experience.
Online Gastronomy & Food Culture Courses (Various Platforms)Kaiden Poole brings global influence and culinary storytelling to the team. Based in Vancouver, BC, he earned his Culinary Arts Certificate from Vancouver Island University and expanded his knowledge through studies in gastronomy, nutrition, and sustainability. He focuses on cross-cultural flavors and creative fusion, crafting recipes that make international cuisine accessible to home cooks. For Kaiden, food is about curiosity, creativity, and connection around the table.