
Baked Teriyaki Chicken Recipe That Turns Sticky and Golden
Baked teriyaki chicken recipe fans know exactly why this dish has become such a weeknight favorite in homes everywhere.
Sweet and savory flavors come together beautifully while requiring minimal effort in preparation.
There's something special about how simple pantry staples turn ordinary chicken into something truly memorable.
You can have dinner on the table faster than takeout would arrive at your door.
Plus, cleanup is so much easier when everything cooks on one pan in the oven.
Check out what makes this version so worth making tonight.
All About Baked Teriyaki Chicken Goodness
Which Ingredients Need Preparing Ahead for Baked Teriyaki Chicken
Proteins:Sauce And Seasonings:Garnish:Which Tools Suit Baked Teriyaki Chicken Cooking
Detailed Directions For Making Baked Teriyaki Chicken
Heat Your Oven
Set your oven rack to the middle position and turn the temperature to 400°F. This gives the chicken an even cooking environment so it cooks through without any dry spots on the outside.
Prepare The Chicken
Pat your 4 boneless, skinless chicken breasts dry using paper towels. Moisture on the surface prevents proper browning, so take a moment to get them as dry as possible. Arrange the breasts in a single layer in your baking dish, making sure they lay flat.
Make The Glaze
In a small bowl, combine the ingredients for your glaze:
Stir everything together until the honey breaks down completely into the sauce. The mixture should look smooth and well combined.
Coat The Chicken
Pour your glaze over the chicken breasts in the dish. Use a spoon or brush to make sure each piece gets coated thoroughly on all sides, not just the top. The sauce should pool around the chicken and help keep it moist during baking.
Bake The Chicken
Place the baking dish in your preheated 400°F oven for 20 to 25 minutes. Around the 20-minute mark, insert a meat thermometer into the thickest part of a breast. Your chicken is done when it reaches 165°F internally.
Let It Rest
Take the dish out of the oven and let the chicken sit undisturbed for 5 minutes. This resting period allows the juices to settle back into the meat, keeping each bite tender and flavorful.
Finish And Serve
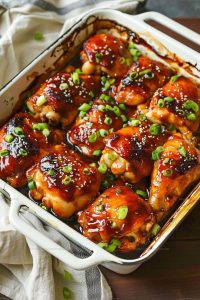
Sprinkle the toppings over your finished chicken:
The seeds add a nice crunch and nutty flavor, while the green onions bring freshness to each plate.
How To Improve Baked Teriyaki Chicken
Ingredient Swaps for Baked Teriyaki Chicken
Which Pairings Suit Baked Teriyaki Chicken
Handy Storage Guide For Baked Teriyaki Chicken
FAQs
Can I use chicken with the skin and bones still on?
Yes, but the cooking time changes. Bone-in, skin-on chicken needs about 30 to 35 minutes instead of 20 to 25 minutes. Check that the thickest part reaches 165°F before eating.
What if I don’t have rice vinegar?
Regular white vinegar works fine as a swap. Use the same amount, though regular vinegar tastes a bit sharper, so your sauce might be slightly tangier.
Should I flip the chicken halfway through baking?
No, flipping isn’t necessary. The sauce keeps everything moist from below, and the oven heat cooks it evenly without turning it over.
Can I make the sauce ahead of time?
Definitely. Mix everything together the night before and keep it in your fridge. Just give it a quick stir before pouring it over your chicken.
What if my chicken breasts are thick?
Pound them to an even thickness before baking so they cook at the same rate. This helps you avoid dry edges while waiting for the center to finish cooking.
How do I know if the chicken is fully cooked?
Use a meat thermometer and stick it into the thickest part without touching bone. When it reads 165°F, your chicken is done and safe to eat.
Baked Teriyaki Chicken Recipe
- Total Time: 35 minutes
- Yield: 4 1x
Description
Baked teriyaki chicken brings together tender chicken breasts with a glossy, savory-sweet sauce that caramelizes beautifully in the oven, creating a dish your family reaches for again and again. Simple ingredients combine to give you a weeknight dinner that tastes like takeout but comes together faster than you’d expect.
Ingredients
Proteins:
- 4 boneless, skinless chicken breasts
Sauce and seasonings:
- 1/2 cup teriyaki sauce
- 2 tablespoons honey
- 1 tablespoon rice vinegar
- 1 teaspoon ginger, minced
- 2 cloves garlic, minced
- 1/2 teaspoon sesame oil
Garnish:
- 2 tablespoons sesame seeds
- 2 green onions, sliced
Instructions
- Set your oven rack to the middle position and heat it to 400°F for even cooking throughout.
- Blot 4 boneless, skinless chicken breasts with paper towels until dry, then arrange them in a single layer in your baking dish.
- Whisk together 1/2 cup teriyaki sauce, 2 tablespoons honey, 1 tablespoon rice vinegar, 1 teaspoon minced ginger, 2 minced garlic cloves, and 1/2 teaspoon sesame oil in a bowl until the honey fully dissolves.
- Pour your sauce mixture over each chicken breast, flipping them to coat both sides evenly.
- Transfer your baking dish to the 400°F oven and bake for 20 to 25 minutes until the thickest part of each breast reaches 165°F internally.
- Take your dish out of the oven and let the chicken sit undisturbed for 5 minutes so the juices settle back in.
- Scatter 2 tablespoons sesame seeds and 2 sliced green onions across your chicken right before plating.
Notes
- Drying your chicken breasts thoroughly before adding sauce helps them brown better and prevents the dish from becoming watery.
- Stir the teriyaki mixture until the honey completely dissolves so the sauce coats evenly and creates a glossy finish on the chicken.
- For a lower-sodium version, swap regular teriyaki sauce for low-sodium teriyaki and reduce the amount slightly since the other ingredients still provide plenty of flavor.
- If your chicken breasts are thick, gently pound them to an even thickness so they cook at the same rate and stay moist throughout baking.
- Prep Time: 10 minutes
- Cook Time: 25 minutes
- Category: Baked Chicken
- Method: Baking
- Cuisine: Japanese
Nutrition
- Serving Size: 4
- Calories: 280 kcal
- Sugar: 12 g
- Sodium: 600 mg
- Fat: 8 g
- Saturated Fat: 1.5 g
- Unsaturated Fat: 6 g
- Trans Fat: 0 g
- Carbohydrates: 14 g
- Fiber: 1 g
- Protein: 35 g
- Cholesterol: 85 mg
Kaiden Poole
Co-Founder & Culinary Story Specialist
Expertise
Global Cuisine Inspiration, Cooking Techniques, Cross-Culture Fusion, Food Trends & Recipe Innovation, Flavor Storytelling, Food Writing, Creative Seasonal Menus
Education
- Program: Culinary Arts Certificate (Professional Cook 1 & 2)
- Focus: Fundamental kitchen techniques, food safety, menu planning, and real-world kitchen experience.
Online Gastronomy & Food Culture Courses (Various Platforms)Kaiden Poole brings global influence and culinary storytelling to the team. Based in Vancouver, BC, he earned his Culinary Arts Certificate from Vancouver Island University and expanded his knowledge through studies in gastronomy, nutrition, and sustainability. He focuses on cross-cultural flavors and creative fusion, crafting recipes that make international cuisine accessible to home cooks. For Kaiden, food is about curiosity, creativity, and connection around the table.